If you’ve tried using Discovery Plus with your Samsung TV, you might be wondering why it’s not working. The issue with Discovery Plus not working on Samsung TV may be a small issue, so don’t worry.
Many times, it will be a small issue and fix for you to start enjoying Discovery Plus again.
In this article, we will go over how to get Discovery Plus working on your Samsung TV. I will cover some common problems that may occur.
- Related article: Why is App Not Working on Samsung TV?
1. Soft Reset or Cold Reboot the Samsung TV
Corrupted settings on the Samsung TV could be preventing Discovery Plus from working. A soft reset, or cold reboot, can help reset the bad settings by stopping all the apps still running in the background that could be causing issues.
There are two ways to perform a cold reboot and restart a Samsung TV.
Method 1 – Follow these steps to soft reset a Samsung TV:
- Unplug the TV’s power cord from the power outlet for at least 60 seconds.
- Plug the power cable back into the wall outlet or surge protector.
- Wait for the TV to finish the power cycle.
Method 2 – To cold reboot the Samsung TV:
- Unplug the TV power cable.
- Press and Hold the Power button for 30 seconds on the Remote Control.
- Plug the TV back into the power outlet.
- Wait for the TV to finish starting up.
2. Check for Samsung TV Firmware Updates
Sometimes, an update for a new version of the Discovery Plus app that may not be compatible with older Samsung TVs.
New firmware updates will be released periodically by Samsung to address any bugs. It’s best to download the updates when they’re released. Updating the TV to the latest software and firmware can help resolve some Discovery Plus app conflicts.
To get the latest firmware update for your Samsung TV, go into the settings menu. You can also download the latest software version for free from Samsung’s website if that’s what you prefer.
Follow the steps below from the TV menu to update the Samsung TV firmware:
1. On the Samsung TV remote control, Press Home.
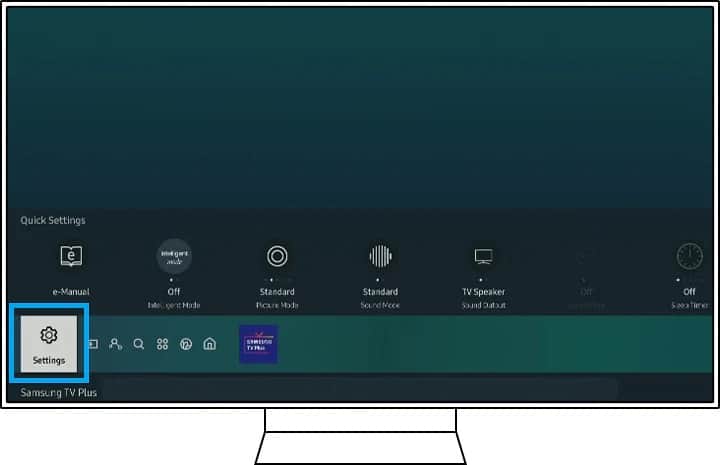
2. Select Settings
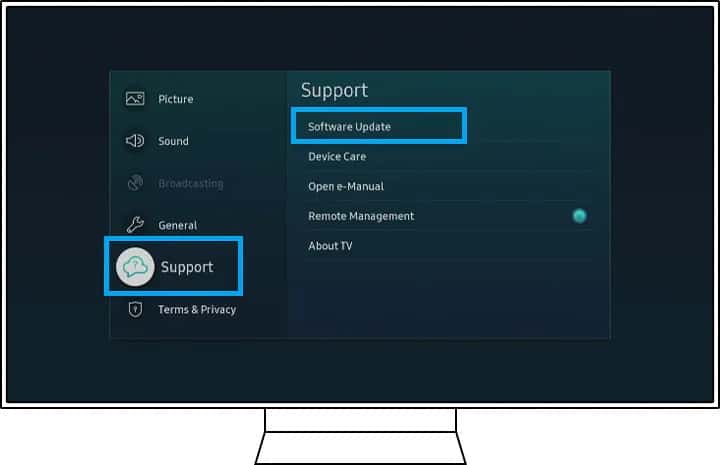
3. Select Support.
4. Select Software Update.
5. Select Update Now.
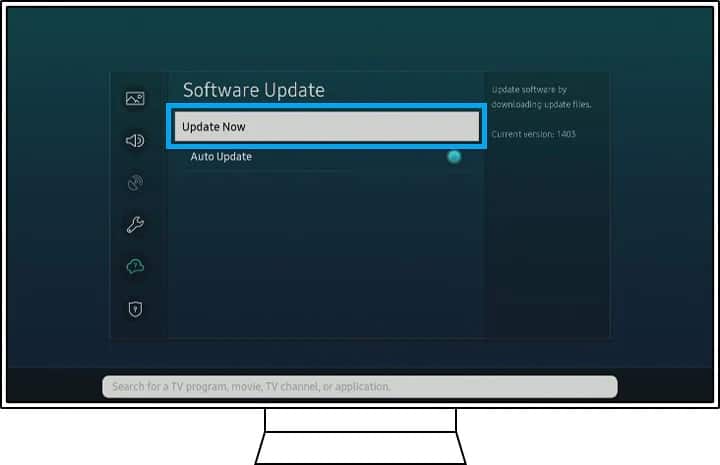
6. The TV will automatically reboot for the new firmware to fully install and take effect.
You can also download an updated version of the Samsung TV firmware and transfer it to a USB drive. Follow these steps:
- On your desktop or laptop, go to the Samsung download page and find your TV model.
- Download the latest firmware version to your computer.
- Extract the files and transfer them to a USB drive.
- Insert the USB drive into one of the USB ports on the TV.
- On the TV remote, Press Home.
- Select Settings.
- Select Support.
- Select Software Update.
- Start the Software Update Process on the TV.
- The TV will reboot and use the updated firmware on the USB drive. Be sure not to remove the USB drive until after the TV has fully rebooted.
3. Remove and Reinstall App
An app conflict can sometimes cause Discovery Plus to stop functioning correctly on a Samsung TV. If you notice that Discover Plus isn’t working properly, try to remove it and then install it again. This may solve the problem.
You can always try installing the latest version of Discovery Plus when one becomes available. You can also try to delete and reinstall the app if things aren’t working for you.
Before you uninstall Discovery Plus, be sure you have the login information somewhere because the saved login information may be lost. You will be signed out of the app, and you will need to sign in again.
Follow these steps to uninstall and reinstall Discovery Plus on a Samsung TV:
1. Press Home on the remote control.
2. Navigate to Apps.
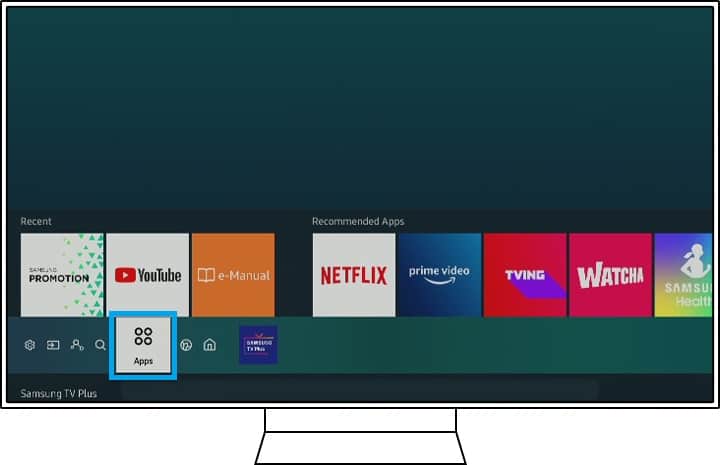
3. Select Settings.
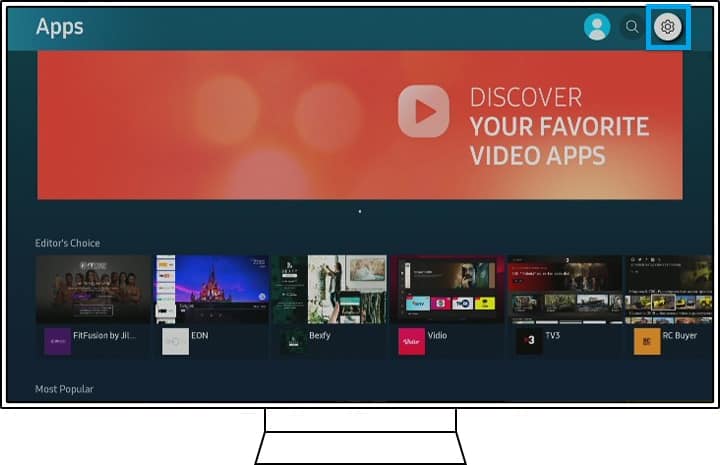
4. Navigate to the Discovery Plus App.
5. Select Delete. If Delete is grayed out, you won’t be able to delete it because it’s a recommended app. Instead, Select Reinstall.
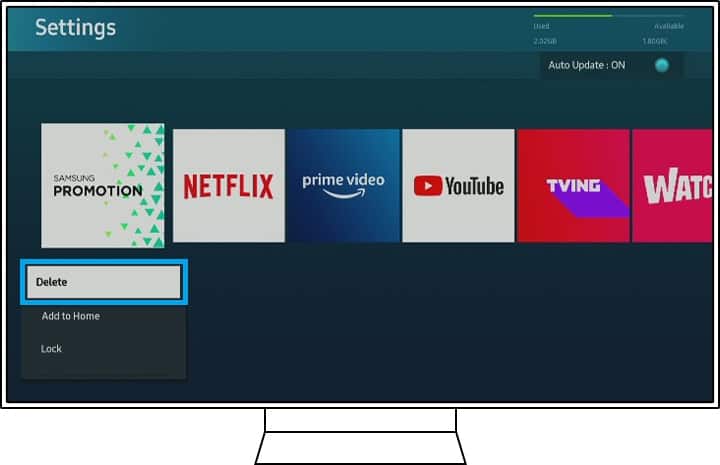
6. Press Return on the Remote.
7. Select Search.
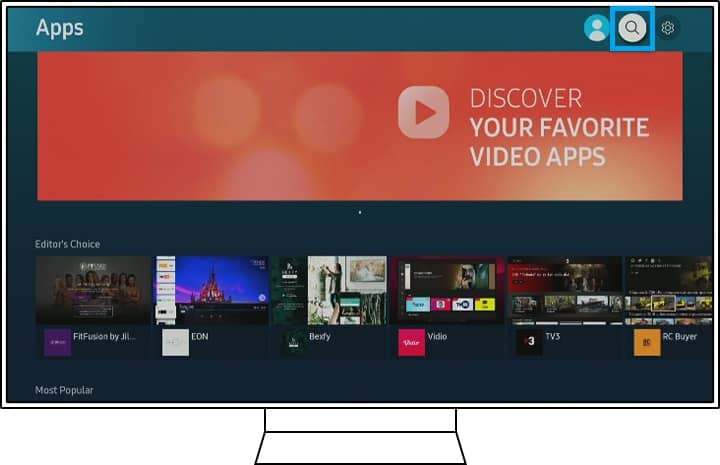
8. Enter the Discovery Plus App Name.
9. Select to Install the Discovery Plus App.
- Press Home on the remote control.
- Navigate to Apps.
- Select Settings.
- Navigate to the Discovery Plus App.
- Select Delete. If Delete is grayed out, you won’t be able to delete it because it’s a recommended app. Instead, Select Reinstall.
- Press Return on the Remote.
- Select Search.
- Enter the Discovery Plus App Name.
- Select to Install the Discovery Plus App.
4. Slow Internet Connection
If you experience the Discovery Plus app freezing or having other problems, it may be because of slow internet connection speeds while streaming high definition (HD) videos.
When streaming from Discovery Plus, if you want to stream 4K video, you will need a minimum download speed of 50+ Mbps. To stream HD video, you will need 5 Mbps.
There may be several reasons why the WiFi download speed is slow. Here are the most commonly encountered reasons and solutions for a slow Internet connection.
1. Weak Wi-Fi Signal to the Samsung TV
If the Wi-fi signal is weak between the TV and the wireless router, the internet connection may sometimes go down and lose its connection. Streaming issues may occur when using the Discovery Plus app.
Make sure the Wi-Fi signal from the TV to the wireless router is strong enough. If you want to check whether the Wi-Fi connection is strong enough, follow these steps.
- On the Samsung TV remote, Press Home.
- Select Settings.
- Select General.
- Select Network.
- Select Open Network Settings.
- Select Wireless.
- In the list of wireless networks, see how many signal bars your wireless network has. 1 to 2 bars is the sign of a weak signal.
If the distance between your wireless network and your Samsung TV is too far, then you may experience poor connection quality and inconsistent Wi-Fi connections.
One other reason why weak Wi-fi signals might be present is because there could be obstacles between the TV and router, like many walls.
Moving the router closer to the TV will be easier for you to do than moving the TV closer toward the router for a stronger signal. If you want better Wi-Fi connections, place your router closer to your devices.
You’ll need to buy a wireless repeater if the router and Samsung TV cannot be moved. WiFi repeaters are also known as WiFi extenders.
The one below is one of the best ones out there and works well in smart homes. They can be found on Amazon:
2. Soft Reset the Wi-Fi Router
If your Wi-fi router hasn’t rebooted or been shut off for some time, there could be issues with its settings that can cause slower Internet speeds and interruptions.
Restarting and power cycling your network equipment, like your router or modem, can help if this is the case.
To soft reset your WiFi Router, follow these steps:
- Unplug the Wi-Fi Router from the power outlet for at least 60 seconds.
- Plug the Wi-Fi Router back in to the power outlet.
- Turn On the Router if there’s an On/Off switch.
- Wait a few minutes for the Router to start up and connect to your Internet Service Provider (ISP).
3. Try a Wired Connection
If your wireless connection is spotty and inconsistent, the router could be having trouble with its wireless signal.
Try using a wired connection to see if it’s the internet connection or the router that’s having issues. Wired connections are often more reliable than wireless ones, and easier to troubleshoot.
You can use a wired connection to test if you have a high-speed connection to your Samsung TV. Use an ethernet cable from the TV to the router to test the internet connection.
Follow these steps to connect and use a wired internet connection with your Samsung TV:
- Plug an ethernet cable into one of the LAN ports on the back of the TV and connect it to the router.
- On the Samsung TV remote control, Press Home.
- Select Settings.
- Select General.
- Select Network.
- Select OK for the TV to use the wired network to access the internet.
If you have an internet connection, the Wi-Fi router’s wireless ability might be having some difficulties. If none of these solutions work, then you might need to replace the router’s firmware, perform a factory reset, or replace the Wi‑Fi adapter.
4. Disconnect Other Devices from the Wi-Fi Network
When multiple devices connect to a single wireless router simultaneously, they may slow down overall network performance for everyone.
For example, when many smartphones, tablets and laptops are all connected to the same Wi-Fi network, each device’s internet speed will be very slow. That’s especially true if they’re all streaming HD videos on Discovery Plus or other streaming platforms.
Older Wi-Fi routers and modems tend to be particularly bad when it comes to dealing with multiple connected devices simultaneously.
If you want to improve your internet speed on your Samsung TV for Discovery Plus, disconnect all the other devices. Then reconnect Samsung TV to the Wi-Fi network again and see if you’re getting fast internet speeds again.
If this fixes the slow internet issue, you know that it was actually a problem with an old router not being able to support multiple devices. You should definitely consider upgrading to a new Wi-Fi router that supports multiple devices sharing the internet simultaneously.
5. Change DNS Server
Sometimes unstable internet connections can cause Discovery Plus issues on the Samsung TV The issues can be caused by incorrect DNS server settings from the ISP.
The Samsung smart TV will usually use the automatic DNS servers from the ISP, but you can change them to other DNS servers.
If you’re experiencing issues when trying to access Discovery Plus servers, you may be able to resolve these issues by switching from your ISP’s DNS servers to Google’s public DNS servers instead. Google’s DNS servers provide a more reliable internet connection than other options.
To manually change and use Google’s DNS servers on the Samsung TV, follow these steps:
- On the Samsung TV remote control, Press Home.
- Select Settings.
- Select General.
- Select Network.
- Select Network Status.
- Select IP Settings.
- Select DNS Setting.
- Select Enter Manually.
- Select DNS Server.
- Enter 8.8.8.8.
- Try to open and reconnect to the Discovery Plus app again.
6. Reset Smart Hub on Samsung TV
Another app that you’re logged into on the Samsung Smart TV could be interfering with Discovery Plus and causing an issue.
If you reset the smart hub on your Samsung TV, it will you sign out of all the apps and may help resolve the problem. Before a smart hub resets, be sure you have access to all the login information, usernames and passwords for each device connected to the hub.
For newer Samsung Smart TV models made after 2020, follow these steps:
- On the remote control, Press Home.
- Select Settings.
- Select Support.
- Select Service Care.
- Select Self Diagnosis.
- Select Reset Smart Hub.
For older Samsung TV models made before 2020, follow these steps:
- On the remote control, Press Home.
- Select Settings.
- Select Support.
- Select Self Diagnosis.
- Select Reset Smart Hub.
If the Samsung TV prompts you asking for a security PIN code to restart the Smart Hub, use the default PIN code: 0000.
You might also need to download Discovery Plus app again after resetting.
Discovery Plus Not Working on Samsung TV Final Thoughts
There are several things which can go wrong with Discovery+ on your Samsung TV. Most of the issues with the Discovery Plus app not working on your Samsung television can be resolved by following the various steps above.
Here are some other apps that can have issues working on a Samsung TV:
- Why is Prime Video Not Working on Samsung TV?
- Why is Fubo Not Working on Samsung TV?
- Why is Pure Flix Not Working on Samsung TV?
Image source: samsung.com

